
Lenovo makes a great deal of excellent, well-engineered hardware, but Lenovo makes some of the world's most truly awful software. They seemingly could care less about the user experience.
Time and time again they prove this with crappy driver support, the unforgivable "Superfish" debacle, a dizzying array of pre-loaded bloatware (even on their corporate systems), confusing and slow websites and obscure design decisions. Who would think to make users hit a tiny pinhead button you can barely see to enter the System Settings. Better yet, make them hold down the FN key, instead of just hitting the F keys at startup.
For example, on a $1500+ high-end Ultrabook, they seriously provide this utility - in 2015 - to upgrade your firmware. Spare us.
Much of Microsoft's excellent work with Windows is undone by this consistently ignorant vendor, who is allegedly one of their biggest and best partners. With friends like these, hey?
It was no surprise then when we went to install Windows 10 on multiple Lenovo systems that, of course, the normal utilities didn't work. Even Microsoft's provided utilities to create a bootable USB to install from scratch failed on Lenovos. One of our systems even blue screened with INACESSIBLE_BOOT_DEVICE after attempting the upgrade.
By contrast, the Dell and HP systems we tried: smooth sailing.
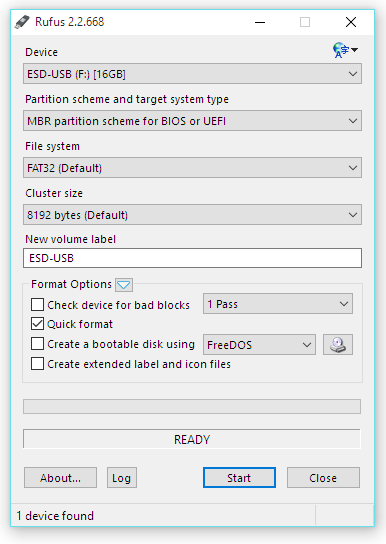
The issue with booting from USB on Lenovo systems like Yoga 2 Pro, Yoga 3 Pro, etc. is that they use the newer (and now fairly common) UEFI instead of the old BIOS. But they, unlike many other vendors, very specifically need to boot from a USB disk formatted with a more obscure compatibility MBR Partition Scheme AND FAT32 file system. No other combination will work, and your shiny new Lenovo will happily and continuously ignore your USB drive at boot.
Ignore the other advice you may find online about switching to Legacy Modes and things of the such in the UEFI Settings. You'll get yourself in a bigger mess, and screw up Secure Boot and lower performance.
The solution is to download the excellent free utility Rufus, and use it to create the correctly configured USB disk.
1. Use Microsoft's utility to download the combination 32 bit and 64 bit ISO installer.
This was the only option we could consistently get to work correctly.Let Microsoft's
utility create a USB drive, then copy all the files and folders in the root to a temporary
folder on your hard drive.Incidentally, you can sure tell a lot of care and attention was
put into this utility, hey Microsoft? cestina? Great default.

2. Run Rufus and choose MBR partition scheme for BIOS or UEFI. Leave everything else the
same and click Start.
3. When complete, copy all the files and folders from your temporary location back into the root of your USB disk.

4. Connect to your Lenovo system and it should boot correctly.If it's not set to boot from USB, power it off, then press the tiny tiny dot on the side to do a custom startup, and
choose Boot Menu
Thanks, once again, for the adventure Lenovo.